Ticketing
Manage and track all your support requests efficiently with the comprehensive ticketing table in CloudPi.
Overview
The Ticketing feature allows teams to:
- Create tickets for cost optimization activities
- Track incidents and service requests
- Integrate with Azure DevOps for work item management
- Monitor ticket resolution progress
- Analyze ticket metrics and trends
Accessing Ticketing
- Navigate to Tickets from the main menu
- View the list of all tickets with their current status
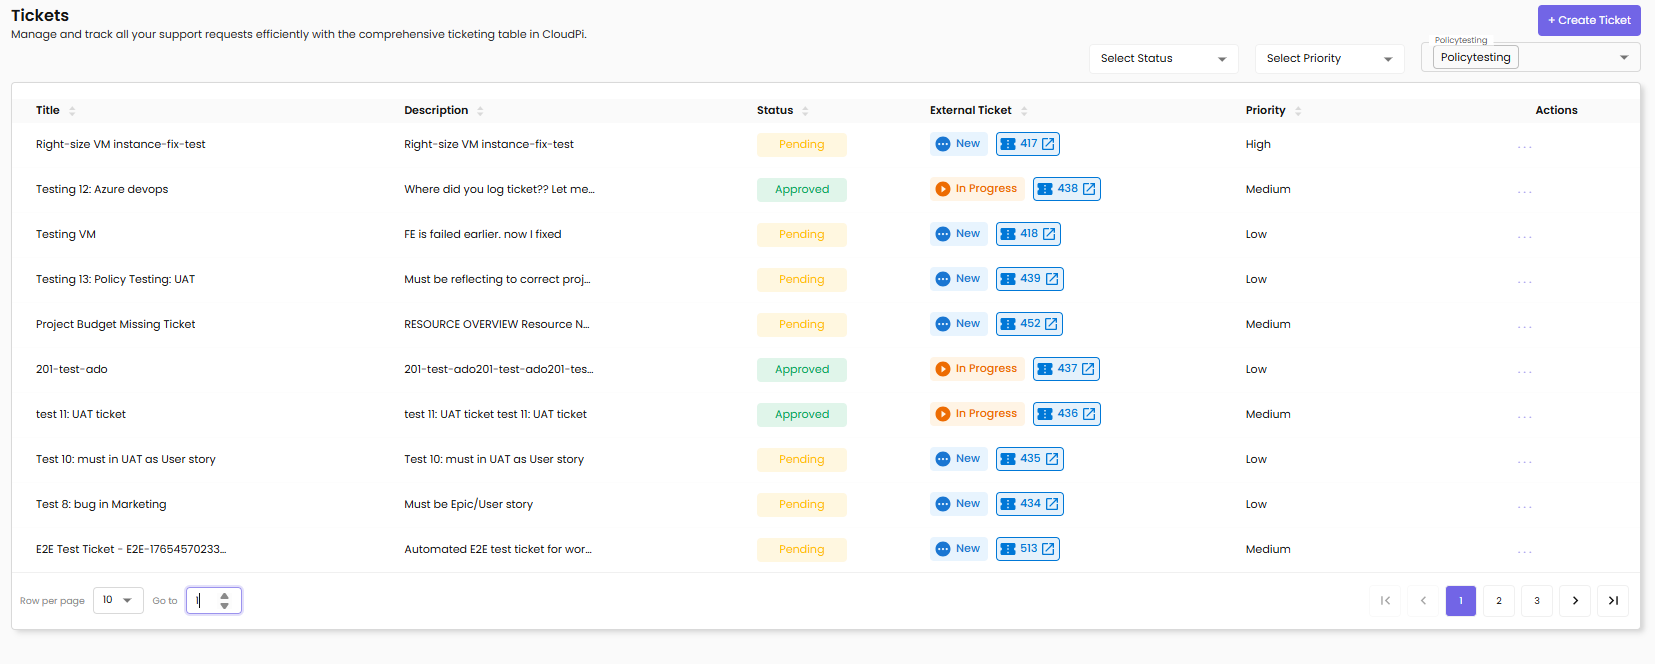
Ticket List View
The ticket list displays all tickets with the following details:
- Title – Brief description of the issue or request
- Description – Detailed ticket information
- Status – Current state (Pending, Approved, New, In Progress)
- External Ticket – Link to the external work item (with Azure DevOps icon and ticket number)
- Priority – Urgency level (High, Medium, Low)
- Actions – View, Edit, Delete options
Ticket Filtering
Use filters at the top of the page to find specific tickets:
- Select Status – Filter by ticket status (Pending, Approved, New, In Progress)
- Select Priority – Filter by priority level (High, Medium, Low)
- Project Filter – Filter tickets by associated project (e.g., Policytesting)
Creating a New Ticket
To create a new ticket, click the + Create Ticket button.
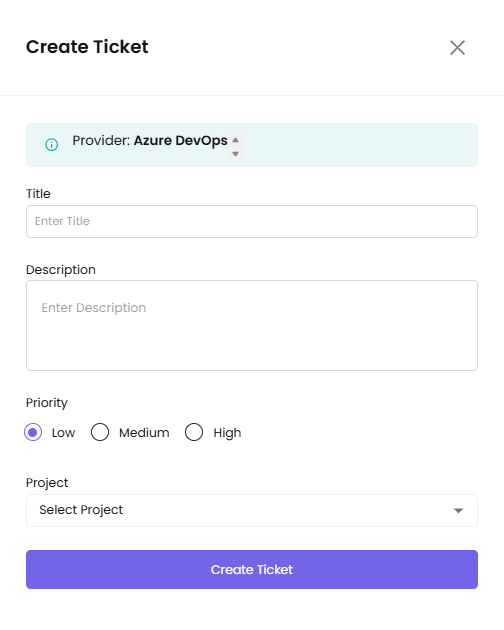
- Provider – The integrated workflow tool (e.g., Azure DevOps)
- Title – Enter a clear, concise issue summary
- Description – Provide detailed issue description
- Priority – Select urgency level (Low, Medium, High)
- Project – Select the associated project from dropdown
Click Create Ticket to submit.
Viewing Ticket Details
Click the view icon in the Actions column to see comprehensive ticket information:
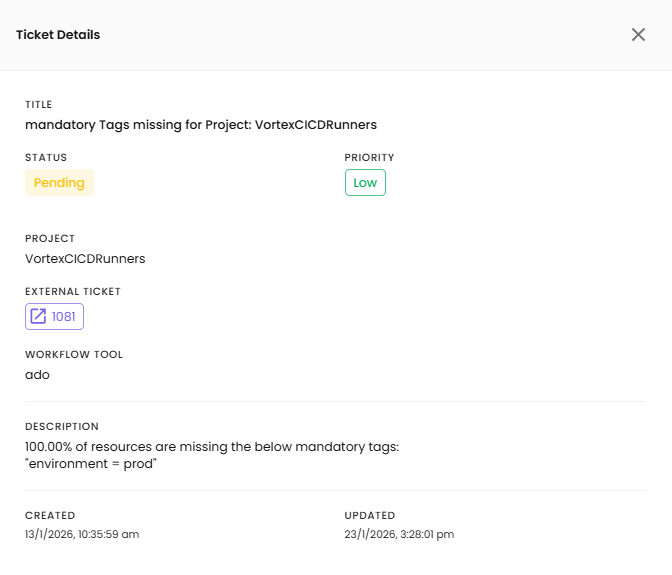
Ticket Details Panel includes:
- Title – The ticket subject
- Status – Current ticket status (e.g., Pending)
- Priority – Urgency level badge (e.g., High in red badge)
- Project – Associated project name
- External Ticket – Link to external work item with ticket number
- Workflow Tool – The integrated system (e.g., ado for Azure DevOps)
- Description – Full ticket description
- Created – Timestamp when ticket was created (e.g., 12/2/2025, 4:44:32 PM)
- Updated – Timestamp of last update (e.g., 1/6/2026, 3:58:04 PM)
Ticket Status
- New – Freshly created ticket (blue badge with "New" label)
- Pending – Awaiting action or review (yellow badge)
- Approved – Ticket has been approved (green badge)
- In Progress – Actively being worked on (orange badge)
Ticket Priority Levels
- High Priority – Critical issues requiring immediate attention (red badge)
- Medium Priority – Important issues with reasonable timelines
- Low Priority – Non-urgent issues that can be addressed later
Azure DevOps Integration
When a ticket is created in CloudPi:
- CloudPi creates a corresponding work item in Azure DevOps
- The External Ticket column displays the Azure DevOps icon with the work item number (e.g., 417, 438, 418)
- Click the external ticket link to open the work item in Azure DevOps
- Status updates are synchronized between CloudPi and Azure DevOps
Required Setup: - Azure DevOps integration configured in Admin Settings - Project mapping established - API credentials configured
For detailed integration setup, see Integration.
Editing Tickets
Click the edit icon in the Actions column to modify ticket details:
Editable Fields: - Title - Description - Priority - Status
Non-Editable Fields: - Provider (set during creation) - Project (set during creation) - External Ticket (managed by integration)
Click Update to save changes.
Deleting Tickets
Click the delete icon in the Actions column to remove a ticket:
- A confirmation dialog will appear
- Confirm the deletion to permanently remove the ticket
- Note: Deleting a ticket in CloudPi does not delete the external work item in Azure DevOps