Automation
Virtual Machine Scheduler
Overview
The Virtual Machine Scheduler feature in CloudPi offers powerful automation for managing the start and stop operations of virtual machines. By configuring schedules, organizations can optimize resource utilization, reduce cloud costs, and ensure efficient cloud infrastructure management. This feature provides a streamlined approach to managing resource availability based on predefined schedules or real-time needs.
Key Features
Comprehensive Schedule Management
Automated Operations - Enable automatic start and stop of virtual machines during specified time periods, optimizing resource availability and cost-efficiency
Vacation and Custom Schedules - Create schedules tailored for holidays, weekends, or specific organizational needs
Multi-Region Support - Manage schedules for resources across different cloud regions seamlessly
Centralized Schedule Overview
Detailed Schedule View - Access all active schedules, including their type (Snooze, Start, or Stop), associated resources, and timing details
Actionable Controls - Modify, delete, or manually override schedules directly from the Schedules screen
Execution Logs - Monitor schedule activities and execution statuses for accountability and troubleshooting
Data-Driven Recommendations
Optimized Scheduling Suggestions - Receive schedule recommendations based on usage patterns to reduce resource idling
Streamlined Implementation - Apply recommendations with minimal configuration through the Recommendations screen
Setup and Configuration
Accessing the Scheduler Feature
- Navigate to Automation - Log into CloudPi and access the Scheduler feature under the Automation section in the main menu
- Explore the Three Main Screens:
- Schedules - Manage and review all active schedules
- Recommendations - View and apply usage-based schedule suggestions
- Resources - Identify eligible resources and create custom schedules
Navigating Schedules
Schedules Screen
View All Schedules - Review the list of schedules with details such as schedule name, type, description, and associated resources
Edit and Delete - Modify schedules or remove outdated configurations directly from the Actions menu
Manual Override - Enable or disable specific resources for temporary overrides without altering the main schedule
Actions
View
The View action allows users to examine the details of a specific schedule without making changes. By selecting this option from the Actions Menu, the system displays a detailed breakdown of the schedule, including key information such as:
Name - Schedule identifier (e.g., ACCOUNT_SNOOZE_REG)
Description - Purpose or usage (e.g., "account testing for scheduler")
Schedule Type - Type of schedule (e.g., Snooze (Stop and Start))
Date Range - Period when the schedule is active
Weekday Timings - Days and times for weekday operations
Weekend Timings - Days and times for weekend operations
The View feature is particularly useful for verifying schedule configurations or sharing information with team members. Users can close the detailed view by selecting the Close View option.

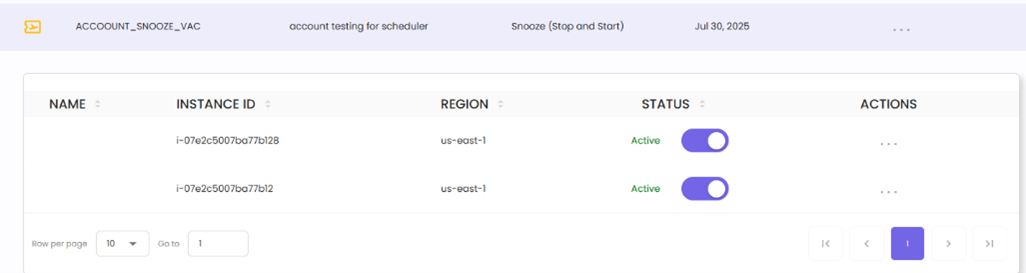
Resource Details Tab:
Shows the list of resources associated with this schedule:
NAME - Resource name
INSTANCE ID - Unique resource identifier
REGION - Cloud region
STATUS - Active/Paused status with toggle
ACTIONS - Additional options menu
Manual Override
The Manual Override feature provides users with the ability to temporarily pause or activate the application of the VM Snooze schedule for individual instances. This allows for greater flexibility in managing resources without permanently modifying the primary schedule.
How It Works:
- Accessing Manual Override:
- Click the Manual Override icon in the Actions menu for a specific schedule
-
This will open a detailed list of instances associated with the schedule
-
Pausing or Activating an Instance:
- Paused - Use the toggle switch to pause an instance, preventing it from being affected by the VM Snooze schedule. This ensures the resource remains operational, regardless of the scheduled start and stop times
-
Active - Use the toggle switch to activate an instance, ensuring it adheres to the VM Snooze schedule
-
Instance Details:
-
The manual override panel displays key details for each instance:
- Resource Name - Name of the instance
- Instance ID - Unique identifier for the instance
- Region - The cloud region where the resource is deployed
- Status - Reflects whether the instance is currently subject to the schedule (Active) or excluded (Paused)
-
Closing Manual Override:
- Once the desired overrides are set, click Close Manual Override to return to the main Schedules view
- Overrides take effect immediately but do not alter the underlying schedule configuration
Edit Action
The Edit feature allows users to modify the configuration of an existing schedule. This ensures flexibility for adapting schedules to changing requirements without the need to create a new schedule from scratch.
How It Works:
- Accessing Edit Mode:
- Click the Edit icon from the Actions menu of the selected schedule
-
This opens the schedule in an editable form
-
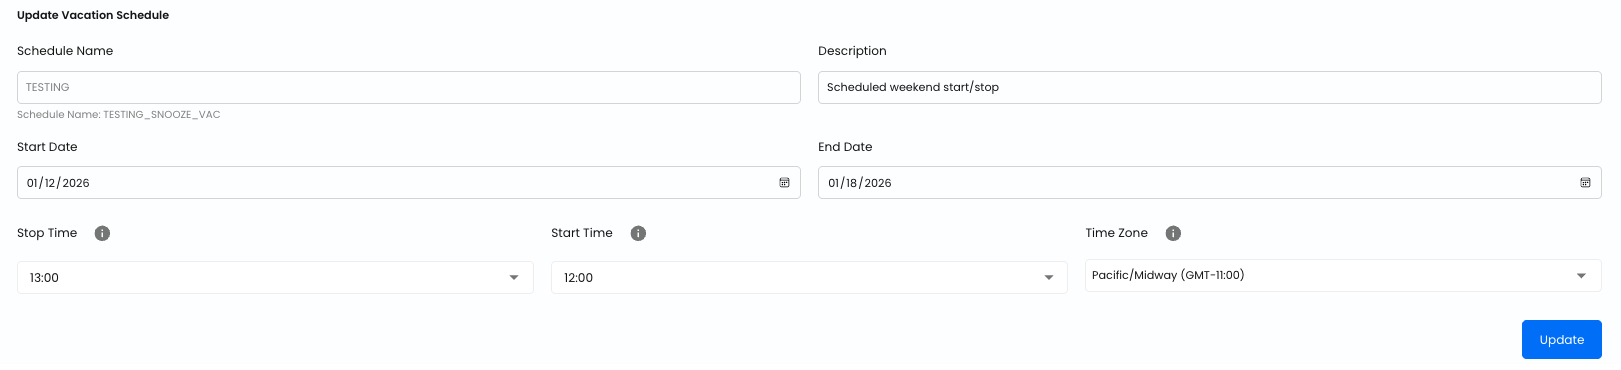
Editable Fields:
Users can update the following details:
Schedule Name - Update the schedule identifier
Description - Modify the description to better reflect the schedule's purpose
Start Date - Update the start date
Start Time - Change when the schedule activates
Stop Time - Change when the schedule deactivates
Time Zone - Select the appropriate time zone (e.g., Asia/Kolkata (GMT+05:30))
- Saving Changes:
- Once the updates are complete, click the Update button to save the changes
-
The schedule is updated in real time, and the changes are reflected in the Schedules screen
-
Closing Edit Mode:
- If no changes are needed, click Close Edit to exit the edit mode without modifying the schedule
Schedule Logs
The Schedule Logs feature provides users with detailed insights into the execution history of a schedule. It helps track the status of scheduled actions, ensuring transparency and simplifying troubleshooting when needed.
How It Works:
- Accessing Schedule Logs:
- Click the Schedule Logs icon in the Actions menu of a specific schedule
-
This opens a log view displaying the execution history
-
Log Details:
Each log entry includes:
Started At - The timestamp when the schedule action began
Completed At - The timestamp when the action finished
Status - Indicates the success or failure of the action (green "Success" label)
Message - Details about the action performed (e.g., instance IDs started/stopped)
- Troubleshooting Support:
- If a schedule action fails, the log entry provides error messages or status details
-
These can be used to identify and resolve issues
-
Closing Logs:
- After reviewing the logs, click Close Logs to return to the main Schedules view

Delete Schedule
The Delete Schedule feature allows users to permanently remove an existing schedule from the system. This is useful for eliminating outdated or unused schedules, ensuring that only relevant configurations are maintained.
How It Works:
- Accessing Delete Option:
- Click the Delete icon in the Actions menu of the selected schedule
-
This action initiates the schedule deletion process
-
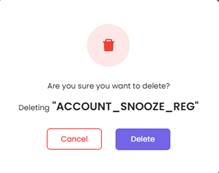
Confirmation Prompt:
- A confirmation dialog appears to prevent accidental deletions
- Users must confirm their intent to delete the schedule
-
Deletion Outcome:
- If confirmed, the schedule is permanently removed from the list, and all associated configurations are erased
- If canceled, no changes are made, and the schedule remains in place
-
Impact on Resources:
- Deleting a schedule does not impact the current state of associated resources
- It only removes the automation tied to the schedule
Export Instance Details
The Export Instance Details feature allows users to download a detailed spreadsheet (.csv) of all active schedules, instances, and their associated configurations. This enables efficient tracking, reporting, and analysis of virtual machine schedules and their statuses.
How It Works:
- Accessing the Export Feature:
-
Click the Export Instance Details button located in the top-right corner of the Schedules screen
-
Downloading the Spreadsheet:
- When clicked, the system generates a spreadsheet and prompts you to download it
-
The file contains detailed information for each schedule and associated instance, including:
- Instance ID
- Region
- Instance Status
- Schedule Name
- Schedule Status
- Schedule Type
- Weekdays
- Weekends
- Action Type
- Description
- Start Date and End Date
- Time zone
- Weekday Start Time and End Time
- Weekend Start Time and End Time
- Is Recommended (Yes/No)
- Tag
-
Spreadsheet Output:
The spreadsheet provides a comprehensive, instance-level view of schedules, enabling users to: - Monitor schedule execution for each instance - Identify instances and schedules based on region, type, or tags - Audit or analyze resource utilization and scheduling effectiveness
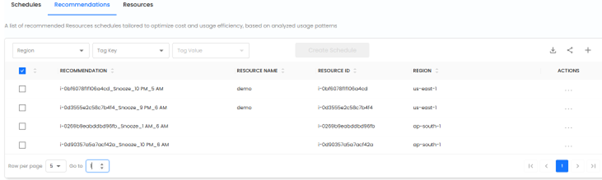
Recommendations
Reviewing Recommendations
The Recommendations Screen displays a list of recommended snooze schedules tailored to optimize resource utilization and cost efficiency. These recommendations are generated based on usage analytics, helping users identify optimal start and stop times for cloud resources.

How It Works:
- Recommendations Column:
- The Recommendation column lists the recommended snooze schedules for each resource
-
Each entry includes:
- Instance ID - Identifies the resource
- Snooze Schedule - Indicates the suggested start and stop times (e.g., Snooze_10 PM_5 AM)
-
Reviewing Suggested Schedules:
- Users can browse the recommendations to understand the proposed snooze schedules
-
The recommendations provide actionable insights for aligning resource schedules with real-world usage patterns
-
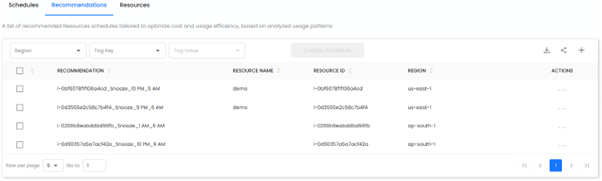
Taking Action:
- Check the boxes next to one or more recommendations to activate the Create Schedule button
-
Use the Create Schedule feature to customize and apply these recommendations
-
Additional Actions:
- Download - Click the Download icon to export the recommendations list
- Share - Click the Share icon to share recommendations via social media, email, or by copying a link
- Add Columns - Click the Add Columns (+) icon to customize visible columns
Actions
View Recommendation Details and Usage Analysis:
Access recommendation details and analysis by navigating to Actions → View. This feature helps users evaluate a recommendation by providing detailed insights and usage analysis, enabling informed decisions about adopting a snooze schedule.
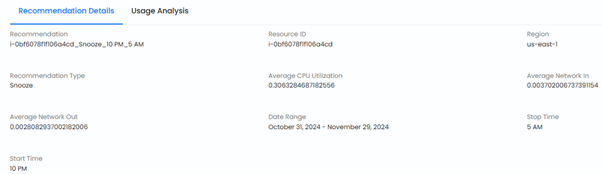
Recommendation Details:
Displays key information about the recommendation: - Resource ID, Name, and Region - Recommendation Type (e.g., Snooze) - Date Range and Start/Stop Times - Average CPU Utilization and Network In/Out metrics
Usage Analysis:
- Provides a visual graph of historical metrics (e.g., CPU Utilization) over a configurable lookback period
- Users can select metrics like CPU or network usage to assess resource activity trends
This feature allows users to validate recommendations before creating schedules, ensuring they align with usage patterns.
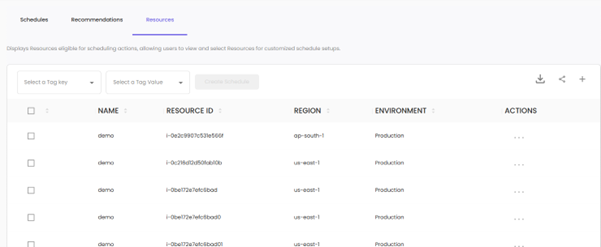
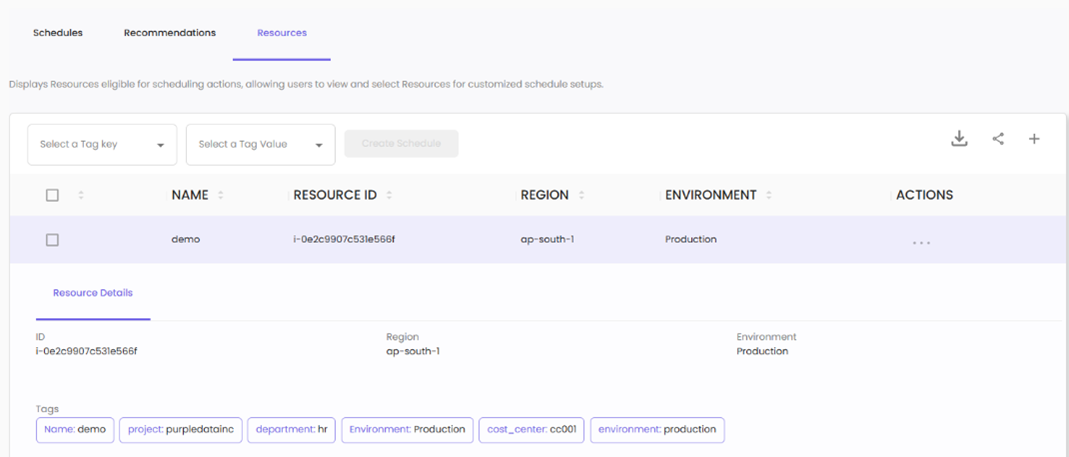
Resource Scheduling
The Resources section allows you to view and manage resources eligible for scheduling actions.
Features:
- Select Resources:
-
Check the box in the row for one or more resources to enable the Create Schedule button
-
Create Schedule:
- After selecting resources, click the Create Schedule button to define scheduling parameters
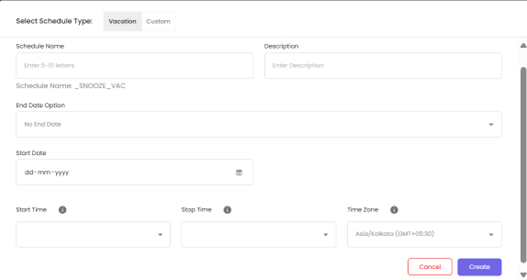
Schedule Configuration:
Select Schedule Type - Choose between Vacation or Custom
Schedule Name - Enter a name (5-10 letters)
Description - Provide schedule purpose
End Date Option - Choose "No End Date" or set an end date
Start Date - Select when the schedule begins
Start Time - Set the activation time
Stop Time - Set the deactivation time
Time Zone - Select appropriate time zone (e.g., Asia/Kolkata)
- View Resource Details:
- Use the View action in the Actions column to see specific details about a resource
Resource Details View:
Shows comprehensive information including: - Resource ID - Region - Environment - Tags (Name, project, department, etc.)
Additional Features:
- Download - Export resource details as a spreadsheet
- Share - Share resource data via various platforms
- Add Columns - Customize the displayed columns for a tailored view of resource data