Budget Management
Overview
The Budget Management module allows users to manage cloud budgets effectively, monitor spending, set forecast projections, and adjust budgets and forecasts as necessary. This module integrates multiple levels of data, such as projects, subaccounts, and tags, and provides granular control over budget thresholds, alerts, and forecast requests.
Key Features
- Create and Manage Cloud Budgets
- Scope Budgets by Project, Subaccounts, and Tags
- Monitor Actual vs. Budgeted Spend vs. Forecast vs. Projected
- Forecast Support at Project Level
- Alert and Notification System for Threshold Breaches
- Lock and Unlock Budgets
- Request and Approve for forecast
Main Menu Structure
The Financials section is the main menu for budget management, with two submenus: Budgets and Forecasts.
Budgets Menu
The Budgets page provides an overview of all budget details across various projects.
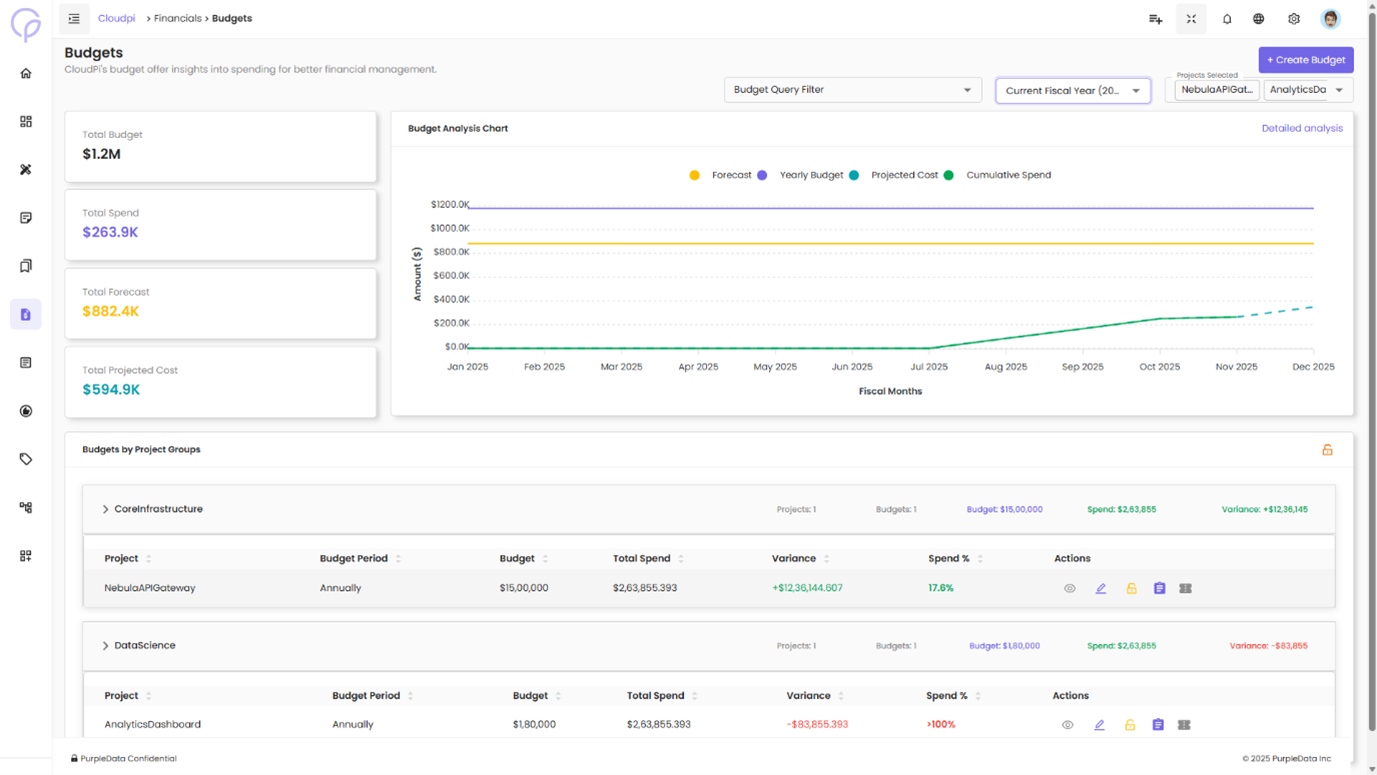
Top Cards Overview
At the top of the page, four key cards provide quick insights into the overall financial status:
Total Budget - Displays the total budget across all projects
Total Spend - Displays the total spending for the selected period
Total Forecast - Shows the total forecasted budget across all projects
Total Projected Cost - Displays the total projected cost for the budget
Budget Summary Line Chart
Below the cards, a line chart displays the following data across fiscal months:
Spend (Green Line) - Represents actual spend data
Forecast (Yellow Line) - Represents the forecasted spend data
Budget (Blue Line) - Displays the allocated budget
This chart gives a visual comparison of the actual spend, forecasted spend, and the total allocated budget for the entire year across all projects.
Filtering Options
You can filter the budget details by selecting:
Projects - Filter by one or more projects
Organizations - Filter based on different organizations
Project Groups - Filter based on specific project groups
These filters enable users to view budget data at different levels, making it easier to analyze spending patterns for multiple projects or organizations.
Budget Management Table
Below the chart, there is a table that displays detailed budget information for each project:
Project Name - Name of the project
Budget Name - Identifier for the budget
Budget Period - Annual or Quarterly
Allocated Budget - Total budget amount allocated
Threshold - The percentage threshold set for budget alerts
Actions - Options to View, Lock, or Unlock the budget
Actions
The Actions column provides options for interacting with the budget details. Based on user permissions, the following actions will be available:
View
Clicking the View icon expands the row to display detailed information about the budget. This view includes:
Allocated Budget - The total budget allocated for the project, broken down by month or period
Used Budget - The amount that has been spent so far within the budgeted period
Forecast - The forecasted spend for the project, including any adjustments made for future periods
Threshold - The alert threshold percentage, indicating the point at which an alert is triggered based on actual spend
Alert Notifications - The email addresses set to receive alerts when the budget threshold is reached
After clicking View, you will see a detailed breakdown of the project's budget, showing both used budget and forecasted spend over the course of the budget period. This view allows users to track how close the project is to exceeding its allocated budget.
Creating a New Budget
To create a new budget, click the Create icon. This will open the Create Budget form, where you must provide the following details:
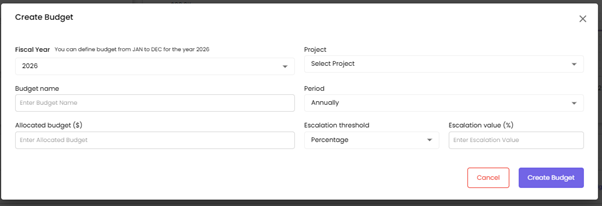
Form Fields
Budget Name - Enter a unique and identifiable name for your budget (e.g., Budget_Beta, Project_Alpha_Budget)
Project - Select the project this budget will be associated with from the dropdown list (e.g., TestProject_Demo, Project_Data)
Period - Choose the budget cycle – either Annually or Quarterly
Start Date - Select the month and year when the budget period should begin (e.g., June 2025)
Allocated Budget ($) - Input the total amount allocated for the selected period (e.g., $120,000)
Escalation Type - The Escalation Type allows defining how forecast approvals should be automatically escalated — either based on a percentage of the total forecast or an absolute amount
Escalation Value ($ or %) - The Escalation Value represents the threshold limit up to which the forecast request can be auto-approved without requiring manual intervention
For example: - A 70% escalation value means requests within 70% of the approved forecast will be auto-approved - A $50,000 escalation value means any request within this amount will not require manual escalation
This mechanism helps streamline approvals, reduce delays, and ensure faster processing of routine forecast changes within acceptable risk limits.
Once all fields are filled, click the Create Budget button. The new budget will be added to the system and made available for tracking and management.
Editing a Budget
After creating a budget, you can update it by clicking the Edit icon. The form will open pre-filled with existing values, allowing you to modify:
Budget Name - Change the budget identifier (e.g., Change Budget_Beta to Updated_Budget_Beta)
Period - Change the budget cycle (e.g., Change from Annual to Quarterly)
Escalation Type and Value - Update escalation settings (e.g., Change to Amount, set value to $100,000)
Click the Update button to save the changes.
Lock/Unlock Budgets
The lock/unlock feature ensures budget integrity:
Locking - Prevents any changes to the budget or forecast. Ideal for finalized budgets.
Unlocking - Allows editing if required by authorized users.
Forecast
The Forecast module helps organizations proactively manage cloud budgets by tracking allocated budgets, forecasts, and actual spend across projects. It provides a detailed, month-wise breakdown and allows users to request and approve forecast changes.
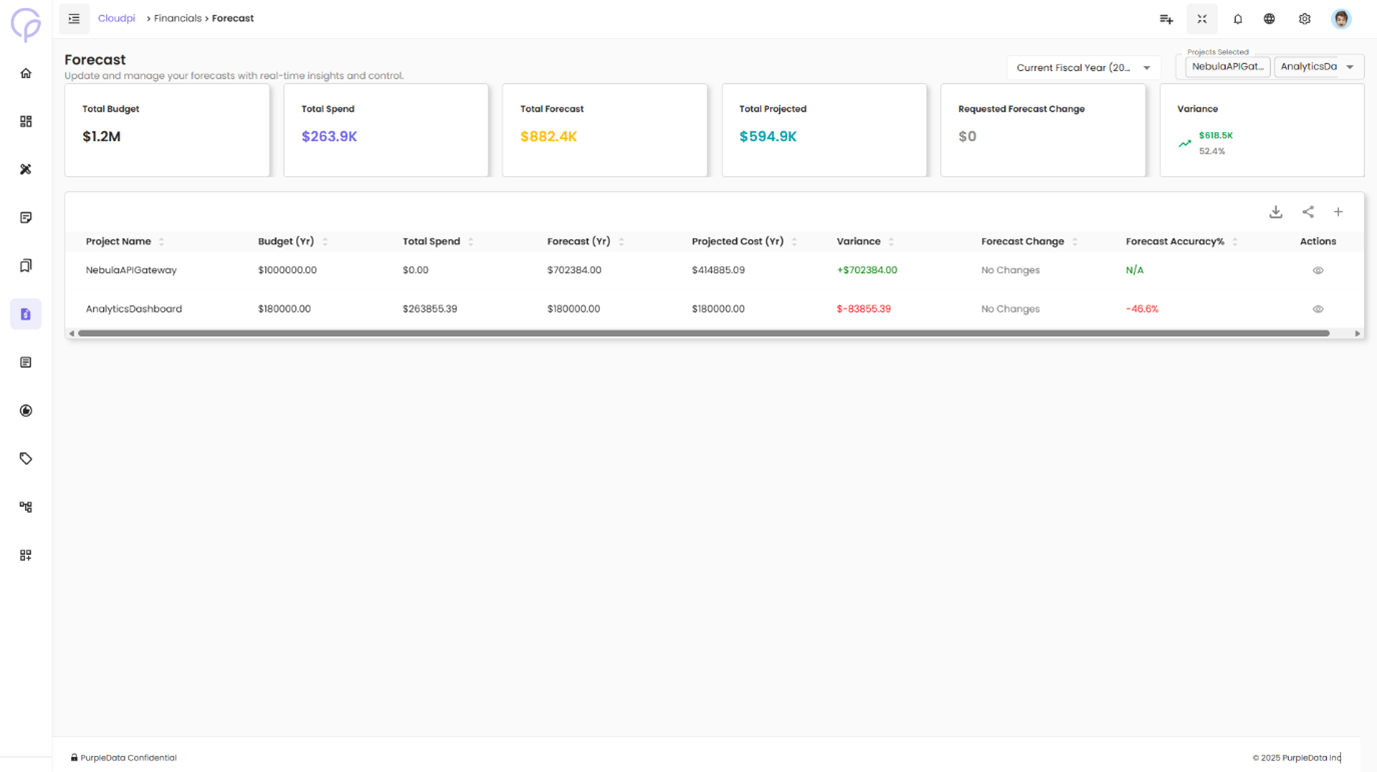
Forecast Summary Cards
At the top of the Forecast page, you'll see high-level budget metrics:
Total Allocated Budget - Total budget assigned across all projects
Total Budget Spend - Actual cloud spend till date
Total Forecast - Sum of forecasted costs for all projects
Total Projected - Placeholder for projected spend (currently $0)
Requested Forecast Change - Total forecast change currently under review
Variance - Difference between budget and actual spend (negative values indicate overspending)
These indicators give you instant visibility into how well your organization is tracking against budget.
Forecast Table Overview
Below the summary cards is a table listing all active projects. For each project, the following fields are displayed:
Project Name - Name of the cloud project (e.g., CPDev, NPDDev)
Budget (Yr) - Total yearly budget allocated
Forecast (Yr) - Total forecast amount for the year
Forecast Change - Status showing if any forecast modifications were requested
Start Date - When the budget period begins
Actions - Options to view detailed monthly forecast data and submit change requests
You can also use filters and pagination to search for specific projects.
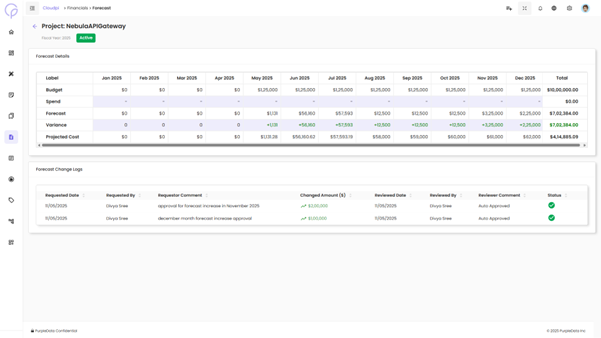
Viewing Forecast Details
Click the ellipsis icon (···) under Actions for a project and select View Forecast. This expands the row and displays detailed forecast data for each month.
The detailed forecast section shows:
Budget - Monthly allocation based on the total annual budget
Spend - Actual cloud spend for each month
Forecast - Current monthly forecast values
Variance - The difference between forecast and spend. Positive variance is shown in green, while overspending is shown in red.
Requested Change - Any pending forecast change requests
New Forecast ($) - Updated forecast values that will apply once the change is approved
At the far right, the Total column aggregates each row's data for the year.
Editing Forecasts
Project Admin can submit a forecast change by editing the "New Forecast ($)" field and providing a reason. After clicking Save Forecast, the change request is sent for approval.
Forecast Approval Workflow
Once a forecast change is submitted:
- Workspace Admins/Users receive a notification to review the request
- They can either Approve or Reject the change
- A comment or reason is required for any approval or rejection
- Once approved, the forecast is updated and reflected in both the table and summary metrics
Change Logs Tab
Alongside the Forecast Changes tab, you will find the Change Logs tab. This section records the entire history of forecast changes.