Policies & Workflows
Manage project-level policies and workflows to ensure compliance and streamlined cloud governance. The Policy and Workflow page provides a centralized location to monitor, configure, and automate responses to cloud events within your projects.
Overview
In CloudPi, Policies and Workflows work together to help you monitor your cloud environment and automate responses to events.
Policy - A Policy defines the conditions and thresholds you want to monitor, such as resource usage, cost limits, security compliance, or specific service-level events.
Workflow - When a Policy condition is met, a Workflow is automatically triggered. A workflow is a set of automated actions configured to respond to the policy event. These actions can include sending email alerts, creating backups, generating snapshots, creating tickets, or executing other predefined tasks to manage the situation.
By combining Policies and Workflows, CloudPi enables proactive monitoring and automation, helping you maintain complete control over your cloud infrastructure with minimal manual intervention.
Prerequisites
- Project Admin or Workspace Admin role (see RBAC)
- Access to at least one project
- For external workflow actions: configured integrations (see Integrations)
Accessing Policies & Workflows
- Select a project from the project selector
- Navigate to Automation from the main menu
- Select Policy and Workflow
- You will see a list of all policies available for the selected project
Note: The policies you see include both Mandatory policies (enforced organization-wide) and Optional policies (that can be enabled at the project level). To configure organization-wide policy settings, see Global Policy Settings.
Understanding Policy Types
Mandatory Policies
Mandatory policies are set at the organization level by Workspace Admins and automatically apply to all projects. These policies:
- Cannot be disabled at the project level
- Appear with an Active status that cannot be toggled off
- Require workflows to be configured for automated actions
Optional Policies
Optional policies can be enabled or disabled by Project Admins for their specific projects. These policies:
- Are inactive by default
- Can be toggled on/off based on project needs
- Allow project-level customization of governance rules
To learn more about how policies are configured organization-wide, see Global Policy Settings.
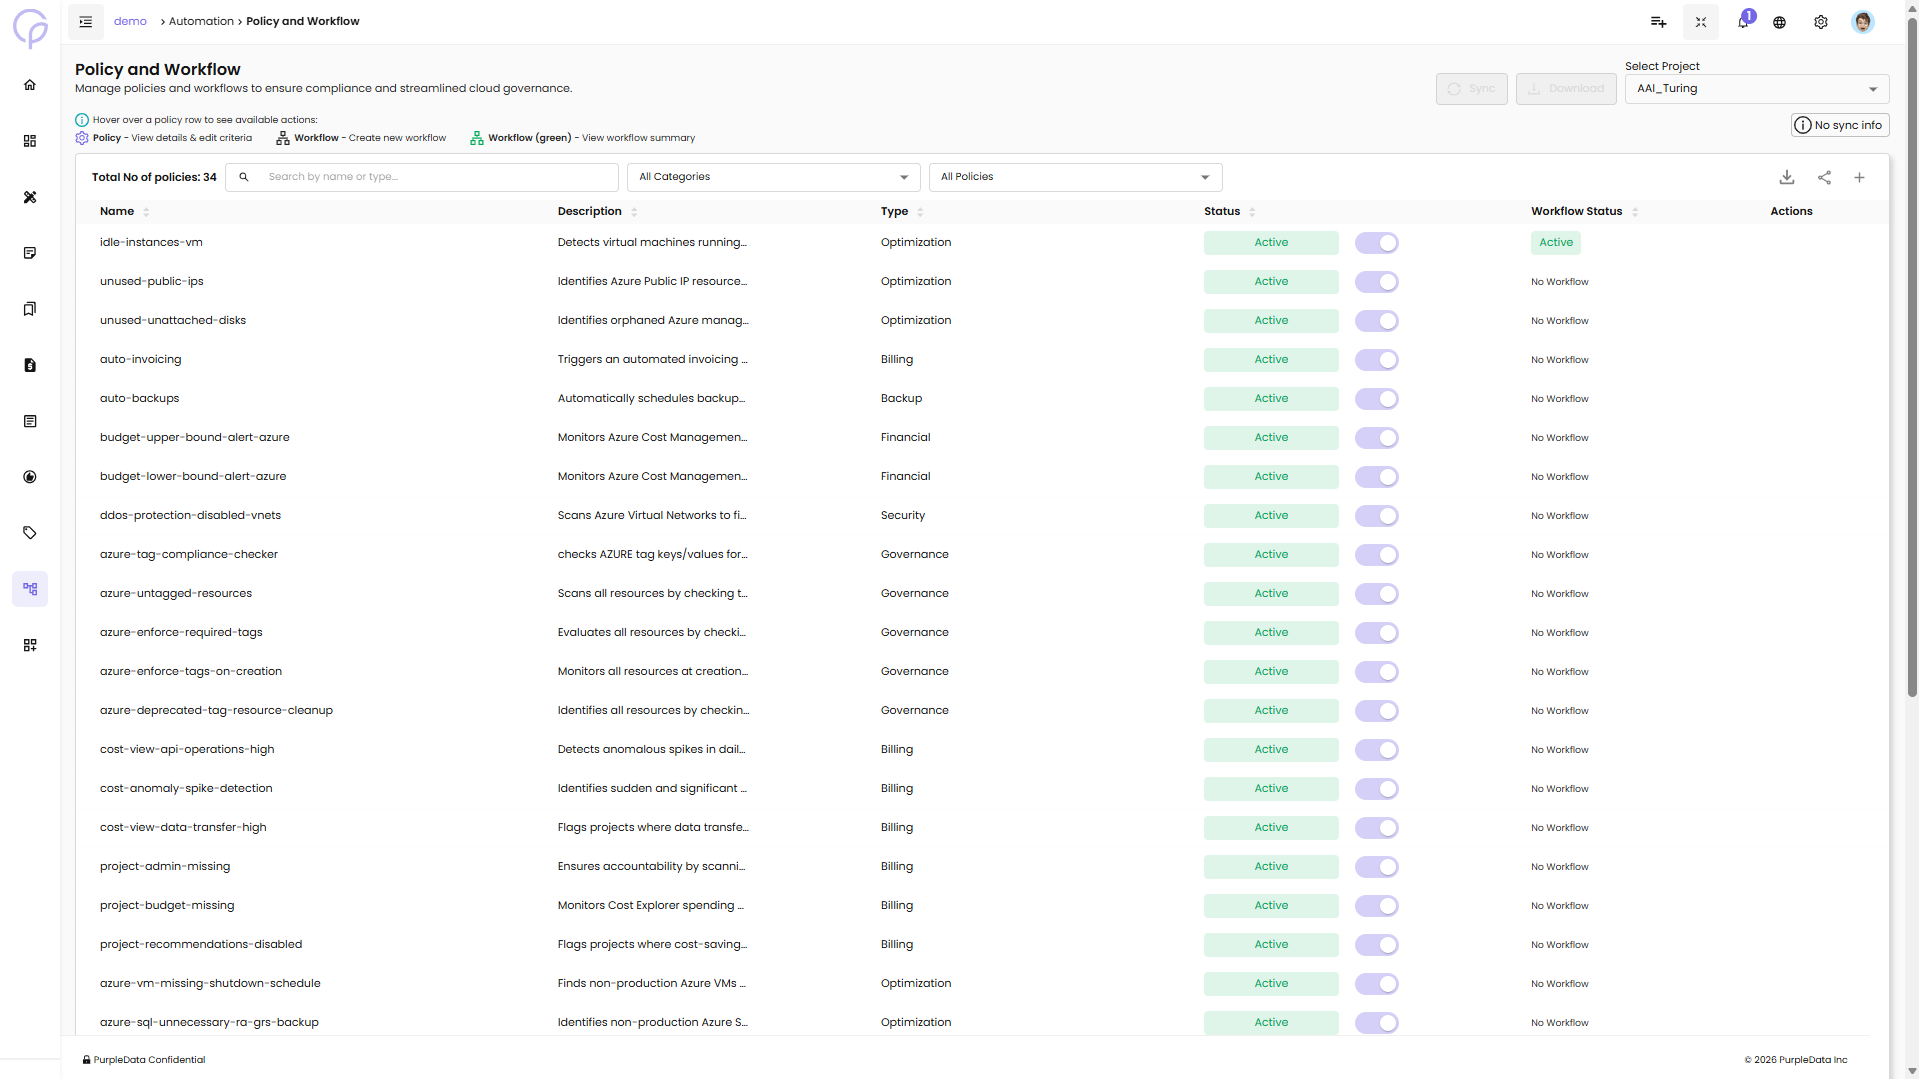
Policy Management
Policy Page Features
Total No of policies - Displays the count of all policies in the project
Search - Search by name or type to find specific policies
All Categories - Filter policies by category (Optimization, Billing, Backup, Financial, Security, Governance)
All Policies - Filter to show all policies or specific subsets
Sync - Synchronize policy data
Download - Export policy list
Policy List Columns
Name - Policy identifier (e.g., idle-instances-vm, unused-public-ips, unused-unattached-disks, auto-invoicing, auto-backups)
Description - Brief description of what the policy detects or enforces (e.g., "Detects virtual machines running...", "Identifies Azure Public IP resource...", "Identifies orphaned Azure manag...")
Type - Category of policy (Optimization, Billing, Backup, Financial, Security, Governance)
Status - Shows if policy is Active (green badge) with toggle switch to enable/disable
Workflow Status - Indicates if a workflow is configured (Active in green or No Workflow)
Actions - Menu to view/edit policy details and configure workflows
Available Actions
In the Actions column, each policy row displays two icons:
- Settings icon (gear) - Click to view and edit policy details and criteria
- Workflow icon (network diagram) - Click to create a new workflow, or if a workflow already exists, the icon appears green and allows you to view the workflow summary
Viewing Policy Details
Click the settings icon (gear) in the Actions column to open a sidebar with three tabs:
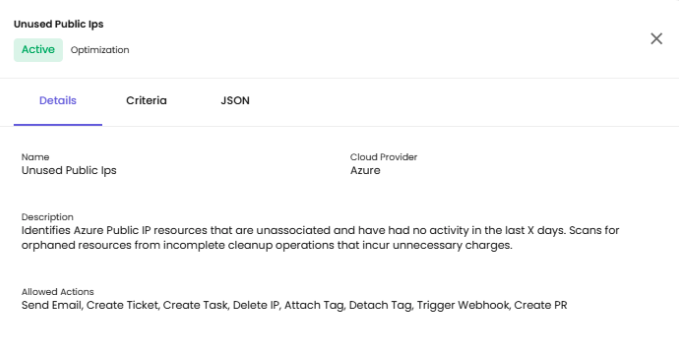
Details Tab
Name - Policy name (e.g., Unused Public Ips)
Cloud Provider - Cloud platform (e.g., Azure)
Description - Full description of the policy's purpose (e.g., "Identifies Azure Public IP resources that are unassociated and have had no activity in the last X days. Scans for orphaned resources from incomplete cleanup operations that incur unnecessary charges.")
Allowed Actions - List of actions available for this policy:
- Send Email
- Create Ticket
- Create Task
- Delete IP
- Attach Tag
- Detach Tag
- Trigger Webhook
- Create PR
Criteria Tab
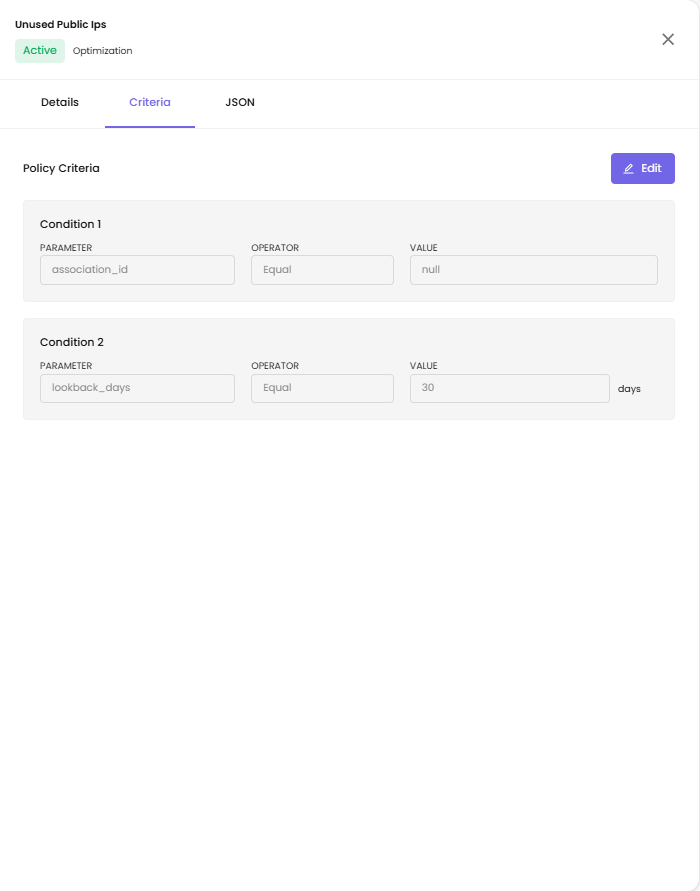
Shows the policy criteria with editable conditions. Click the Edit button to modify criteria.
Policy Criteria:
Condition 1
- Parameter - The field being evaluated (e.g., association_id)
- Operator - The comparison type (e.g., Equal)
- Value - The comparison value (e.g., null)
Condition 2
- Parameter - The field being evaluated (e.g., lookback_days)
- Operator - The comparison type (e.g., Equal)
- Value - The comparison value with unit (e.g., 30 days)
JSON Tab
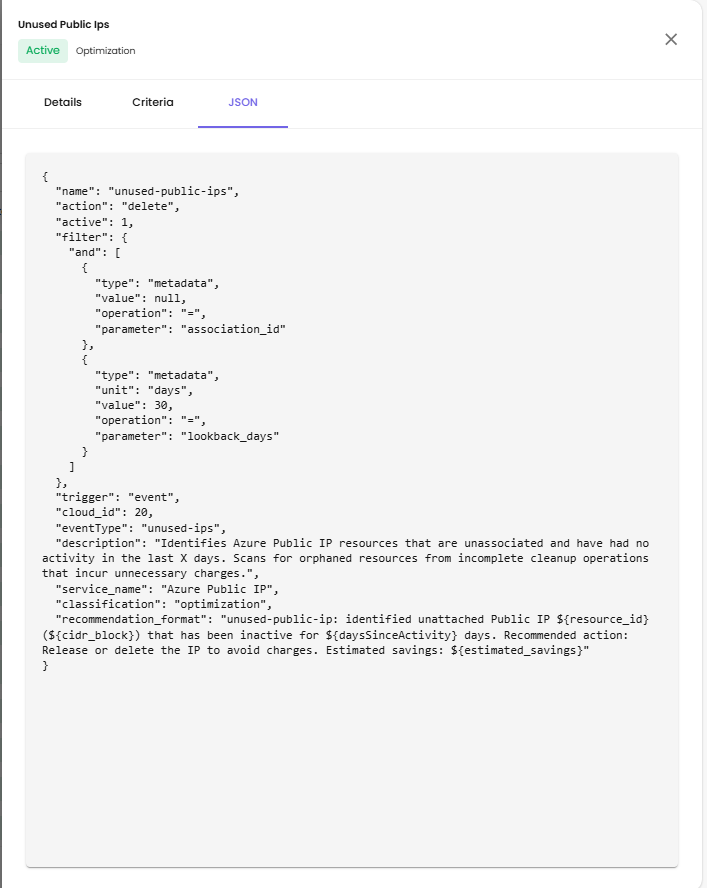
Displays the complete policy configuration in JSON format, including:
- name - Policy identifier
- action - Default action type
- active - Policy status
- filter - Conditions with "and" logic
- trigger - Event-based or scheduled
- cloud_id - Cloud provider identifier
- eventType - Type of event monitored
- description - Full policy description
- service_name - Target cloud service
- classification - Policy category
- recommendation_format - Template for recommendation messages
Workflows
Configure a Workflow
After configuring your policy, you can create or edit workflows:
- Click the Workflow icon (next to the Settings icon) for a specific policy
- A sidebar opens showing the workflow configuration options
Workflow Logs
Workflow Logs are captured during the execution of a policy. These logs help you:
- Track the execution status of each workflow
- Monitor actions performed
- Identify any errors or failures during automated processes
Define Workflow Details
When creating a workflow, you need to provide:
Workflow Name - Enter a name for your workflow (e.g., untagged-instances-ec2)
Description - Provide a clear description of the workflow's purpose
Set Up Workflow Rules
Each workflow contains rules that define how and when the actions are executed:
Select Services - Choose the cloud service this rule applies to (e.g., EC2, S3, etc.)
Inclusions (Optional) - Click + Add Inclusion to specify any resources or conditions that should be explicitly included in this rule
Exclusions (Optional) - Click + Add Exclusion to define any resources or conditions that should be excluded from this rule
Configure Actions
Actions define what CloudPi should do when the policy conditions are met:
-
Select Action - Choose the action from the dropdown (e.g., Send Email, Create Snapshot, etc.)
-
Action Parameters:
- For actions like Send Email, enter the recipient's email address
-
For actions like Create Snapshot, select the target resource
-
Add Additional Actions - Click + Add Action to define multiple actions within the same rule
-
Set Delay (Optional) - You can optionally specify a delay in days or hours before the action is executed
Add More Rules (Optional)
To add multiple rules within the same workflow, click + Add Rule.
Save the Workflow
Once all rules and actions are configured:
- Click Save Changes to finalize the workflow
- Click Cancel if you want to discard the changes
View Workflow Details
After saving the workflow, go to the Workflow list and click on the Workflow Name to view its full configuration, including all rules and actions.
Common Policy Examples
This section provides real-world examples of commonly used policies and workflows to help you get started quickly.
Billing View Report Delivery Policy
Billing view delivery policy is a built-in policy that automates the process of generating invoices every month based on data usage. This ensures timely billing and reduces the need for manual intervention.
Use case: Managed service providers or IT departments that need to bill customers or internal teams monthly based on cloud usage.
How to Set Up a Time-Based Workflow for Auto Invoicing:
-
Workflow Name - Give your workflow a name that clearly indicates its purpose, such as
auto-invoicing -
Description (Optional) - Add a short description to explain what the workflow does—e.g., "Automatically generates invoices based on usage every month"
-
Schedule:
- Start Date - Select the date when the workflow should begin
-
Frequency - Choose how often the workflow runs (e.g., Monthly)
-
Billing Details:
- Billing View - Select the billing view that contains usage data
- Customer - Choose the customer who should be billed
-
You can add multiple billing configurations using the Add Billing option if needed
-
Actions:
- In the Actions section, select the action Schedule Auto Invoicing from the dropdown menu
-
You can add additional actions if your workflow needs to perform multiple tasks
-
Save Workflow - Once all the information is filled out, click on the Create Workflow button to activate it
Idle Instance Detection
Use case: Automatically identify and alert on virtual machines with low CPU utilization to reduce waste.
How to configure:
1. Enable the idle-instances-vm or idle-instances-ec2 policy
2. Configure a workflow with the action Send Email to notify the resource owner
3. Optionally add Create Task or Create Ticket to track remediation
Untagged Resource Compliance
Use case: Enforce tagging standards by identifying resources missing required tags.
How to configure:
1. Enable the untagged-instances or azure-untagged-resources policy
2. Configure a workflow with the action Attach Tag to automatically apply default tags
3. Add Send Email to notify the resource owner about tagging requirements
Cost Anomaly Alerts
Use case: Get notified when project spending exceeds normal patterns or budget thresholds.
How to configure:
1. Enable budget-related policies like budget-upper-bound-alert-azure
2. Configure a workflow with Send Email and Create Ticket actions
3. Set up thresholds in the policy criteria to match your budget limits